
728x90
LinearLayout은 쉽게 생각하면 층을 쌓는다.
특징: orientation 지정 가능.
android:orientation="vertical"은 세로 방향
android:orientation="horizontal"은 가로 방향
설정을 안 하면 기본(default)는 horizontal이다. horizontal을 쓸 것이라도 기입해 주는 게 좋다.
android:layout_height="match_parent"이걸 wrap_content로 바꾸면
길이가 차지하는 만큼으로 바뀐다.
android:gravity="center"를 하면 중력에 의해?(ㅋㅋㅋ) 중간으로 쏠린다.
left,right도 되는데 위젯들을 레이아웃 안으로 넣을 때 기본(default)값은 left이다.
android:background="#ffffff"하면 색상 활성화
android:textColor="#ffffff"글씨 색 바꾸기 기본은 흰색이다.
android:textSize="20sp"보통 글씨 크기 단위는 sp
※ 레이아웃이나 특정 위젯의 길이 지정은 dp

레이아웃이 변경이 원활하게 이루어지지 않을 때는 Force Refresh Layout 버튼을 통해 재구성 할수 있다. (단축키 R)
중간 과정 코드
<?xml version="1.0" encoding="utf-8"?>
<LinearLayout xmlns:android="http://schemas.android.com/apk/res/android"
    xmlns:app="http://schemas.android.com/apk/res-auto"
    xmlns:tools="http://schemas.android.com/tools"
    android:orientation="vertical"
    android:background="#536DFE"
    android:layout_width="match_parent"
    android:layout_height="match_parent"
    tools:context=".MainActivity">

    <LinearLayout
        android:layout_width="match_parent"
        android:layout_height="wrap_content"
        android:gravity="center"
        android:orientation="horizontal"
        >

        <TextView
            android:layout_width="wrap_content"
            android:layout_height="wrap_content"
            android:text="Hello World!"
            app:layout_constraintBottom_toBottomOf="parent"
            app:layout_constraintEnd_toEndOf="parent"
            app:layout_constraintStart_toStartOf="parent"
            app:layout_constraintTop_toTopOf="parent" />

    </LinearLayout>

    <TextView
        android:layout_width="wrap_content"
        android:layout_height="wrap_content"
        android:text="Hello World!"
        app:layout_constraintBottom_toBottomOf="parent"
        app:layout_constraintEnd_toEndOf="parent"
        app:layout_constraintStart_toStartOf="parent"
        app:layout_constraintTop_toTopOf="parent" />

    <TextView
        android:layout_width="wrap_content"
        android:layout_height="wrap_content"
        android:text="Hello World!"
        android:textColor="#ffffff"
        android:textSize="20sp"
        app:layout_constraintBottom_toBottomOf="parent"
        app:layout_constraintEnd_toEndOf="parent"
        app:layout_constraintStart_toStartOf="parent"
        app:layout_constraintTop_toTopOf="parent" />

</LinearLayout>*하드 코딩이란?
wrap_content
match_parent는 자동적으로 수치가 결정되지만
30dp, 40dp와 같은 특정 값을 주는 것
android:src="@drawable/ic_launcher_foreground"drawble 폴더에 있는 이미지 가져와라
중간 과정 코드
<?xml version="1.0" encoding="utf-8"?>
<LinearLayout xmlns:android="http://schemas.android.com/apk/res/android"
    xmlns:app="http://schemas.android.com/apk/res-auto"
    xmlns:tools="http://schemas.android.com/tools"
    android:layout_width="match_parent"
    android:layout_height="match_parent"
    android:background="#536DFE"
    android:orientation="vertical"
    tools:context=".MainActivity">

    <LinearLayout
        android:layout_width="match_parent"
        android:layout_height="wrap_content"
        android:orientation="horizontal">

       <ImageView
           android:layout_width="60dp"
           android:layout_height="60dp"
          android:src="@drawable/ic_launcher_foreground" />

       <TextView
           android:layout_width="wrap_content"
           android:layout_height="wrap_content"
           android:layout_weight="1"
           android:gravity="center"
          android:text="홍드로이드"/>

       <ImageView
           android:layout_width="60dp"
           android:layout_height="60dp"
           android:src="@drawable/ic_launcher_foreground" />

    </LinearLayout>

</LinearLayout>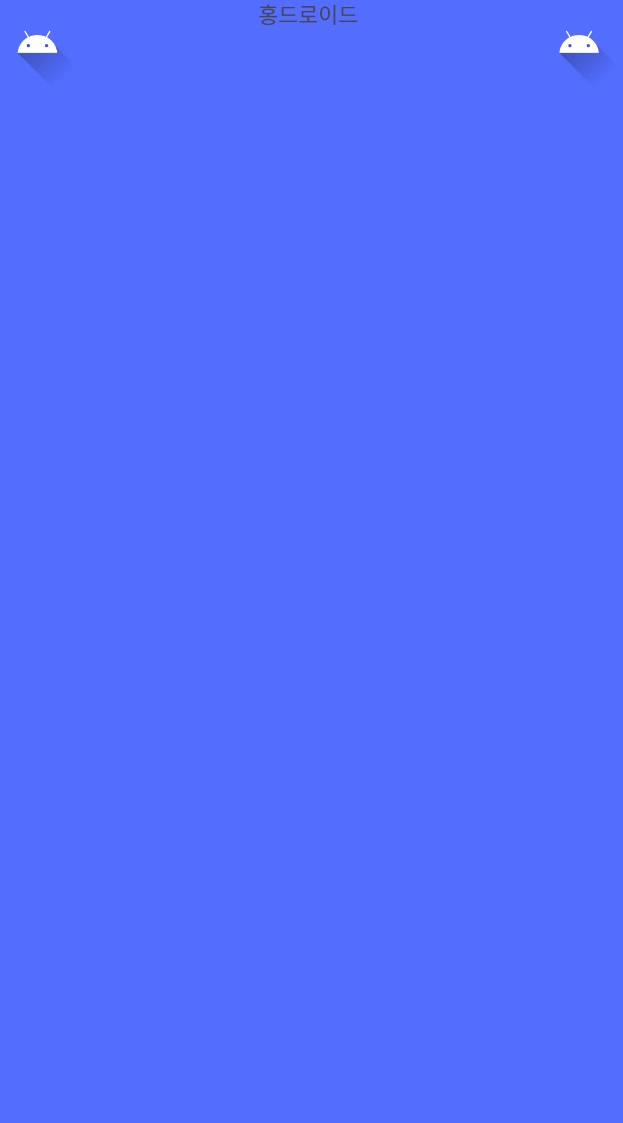
이렇게 항목이 세 개 일 땐 중간에 있는 항목에
android:layout_weight="1"
android:gravity="center"이 구문을 써주면 자리도 차지하면서 중간에 배치가 된다.
android:textStyle="italic|bold"이런 식으로 같이 적용하는 것도 가능하다.
중간 과정 코드
<?xml version="1.0" encoding="utf-8"?>
<LinearLayout xmlns:android="http://schemas.android.com/apk/res/android"
    xmlns:app="http://schemas.android.com/apk/res-auto"
    xmlns:tools="http://schemas.android.com/tools"
    android:layout_width="match_parent"
    android:layout_height="match_parent"
    android:background="#536DFE"
    android:orientation="vertical"
    tools:context=".MainActivity">

    <LinearLayout
        android:layout_width="match_parent"
        android:layout_height="wrap_content"
        android:gravity="center_vertical"
        android:orientation="horizontal">

       <ImageView
           android:layout_width="60dp"
           android:layout_height="60dp"
          android:src="@drawable/ic_launcher_foreground" />

       <TextView
           android:layout_width="wrap_content"
           android:layout_height="wrap_content"
           android:layout_weight="1"
           android:textColor="#ffffff"
           android:layout_gravity="center_vertical"
           android:textSize="20sp"
           android:textStyle="italic|bold"
           android:gravity="center"
          android:text="홍드로이드"/>

       <ImageView
           android:layout_width="60dp"
           android:layout_height="60dp"
           android:src="@drawable/ic_launcher_foreground" />

    </LinearLayout>

</LinearLayout>
android:gravity="center_vertical"세로로 봤을 때 가운데 정렬하게 해라
TextView나 LinearLayout 중 한 군데에만 줘도 적용 되는듯하다.
728x90
'[Android Studio] (Java)' 카테고리의 다른 글
| [Android Studio] 네트워크 상태 체크 (broadcastReciver) (0) | 2023.09.01 |
|---|---|
| [Android Studio] RelativeLayout (0) | 2023.09.01 |
| [Android Studio] Selector (1) | 2023.09.01 |
| [Android Studio] StartActivityForResult (0) | 2023.09.01 |
| [Android Studio] SNS 앱 만들기 #1 (인스타 하단 바) (0) | 2023.08.31 |