
728x90
build.gradle에서
compileOptions 밑에
// 뷰 바인딩 옵션 활성화
    buildFeatures {
        viewBinding = true
}추가
뷰 바인딩은
다양한 위젯들, 객체 연동시 편하다
특징
.xml에서 id를 tv_hello 이런 식으로 설정해도
main에서는 mBinding.tvHello 이런 식으로 카멜 표기법으로 바뀐다.
activity_main.xml
<?xml version="1.0" encoding="utf-8"?>
<LinearLayout xmlns:android="http://schemas.android.com/apk/res/android"
    xmlns:app="http://schemas.android.com/apk/res-auto"
    xmlns:tools="http://schemas.android.com/tools"
    android:layout_width="match_parent"
    android:layout_height="match_parent"
    android:orientation="vertical"
    tools:context=".MainActivity">

    <TextView
        android:id="@+id/tv_hello"
        android:layout_width="wrap_content"
        android:layout_height="wrap_content"
        android:text="Hello World!"
        android:textSize="24sp"
        app:layout_constraintBottom_toBottomOf="parent"
        app:layout_constraintEnd_toEndOf="parent"
        app:layout_constraintStart_toStartOf="parent"
        app:layout_constraintTop_toTopOf="parent" />

    <Button
        android:id="@+id/btn_hello"
        android:layout_width="wrap_content"
        android:layout_height="wrap_content"
        android:text="버튼입니다"/>

    <FrameLayout
        android:id="@+id/main_frame"
        android:layout_width="match_parent"
        android:layout_height="match_parent"
        android:layout_margin="16dp"
        />

</LinearLayout>
MainActivity.java
package com.example.viewbindingexample;

import androidx.appcompat.app.AppCompatActivity;
import androidx.fragment.app.FragmentTransaction;

import android.os.Bundle;
import android.view.View;
import android.widget.Toast;

import com.example.viewbindingexample.databinding.ActivityMainBinding;

public class MainActivity extends AppCompatActivity {

    private ActivityMainBinding mBinding;

    @Override
    protected void onCreate(Bundle savedInstanceState) {
        super.onCreate(savedInstanceState);
        //setContentView(R.layout.activity_main);

        // 액티비티 바인딩 객체에 할당 및 뷰 설정
        mBinding = ActivityMainBinding.inflate(getLayoutInflater()); //inflate는 풀로 붙이다 정도의 뜻 (연동된 inflate 객체 연결)
        View view = mBinding.getRoot();
        setContentView(view);

        mBinding.tvHello.setText("홍드로이드 안녕하세요 ! ");
        mBinding.btnHello.setOnClickListener(new View.OnClickListener() {
            @Override
            public void onClick(View v) {
                Toast.makeText(MainActivity.this,"안녕하세요 !",Toast.LENGTH_SHORT).show();
            }
        });

        // 프레그먼트 교체
        FragmentTransaction ft = getSupportFragmentManager().beginTransaction(); //ft 객체에 할당
        ft.replace(R.id.main_frame, new TestFragment());
        ft.commit();

    }
}
위에 변수 명을 지정하는 곳을 보면 private ActivityMainBinding mBinding; 이렇게
Activity가 먼저 나오는데 이는 xml파일을 따라가는 파스칼 표기법을 사용해서 그렇다.
frag_text.xml
<?xml version="1.0" encoding="utf-8"?>
<androidx.constraintlayout.widget.ConstraintLayout xmlns:android="http://schemas.android.com/apk/res/android"
    xmlns:app="http://schemas.android.com/apk/res-auto"
    xmlns:tools="http://schemas.android.com/tools"
    android:layout_width="match_parent"
    android:layout_height="match_parent">

    <TextView
        android:id="@+id/tv_fragment"
        android:layout_width="wrap_content"
        android:layout_height="wrap_content"
        android:text="홍드로이드 눌러보세요 !"
        android:textSize="24sp"
        android:textColor="#000"
        app:layout_constraintBottom_toBottomOf="parent"
        app:layout_constraintEnd_toEndOf="parent"
        app:layout_constraintStart_toStartOf="parent"
        app:layout_constraintTop_toTopOf="parent" />

    <Button
        android:id="@+id/btn_fragment"
        android:layout_width="wrap_content"
        android:layout_height="wrap_content"
        android:layout_marginTop="16dp"
        android:text="Button"
        app:layout_constraintEnd_toEndOf="@+id/tv_fragment"
        app:layout_constraintStart_toStartOf="@+id/tv_fragment"
        app:layout_constraintTop_toBottomOf="@+id/tv_fragment" />
</androidx.constraintlayout.widget.ConstraintLayout>
TestFragment.java
package com.example.viewbindingexample;

import android.os.Bundle;
import android.view.LayoutInflater;
import android.view.View;
import android.view.ViewGroup;

import androidx.annotation.NonNull;
import androidx.annotation.Nullable;
import androidx.fragment.app.Fragment;

import com.example.viewbindingexample.databinding.FragTestBinding;

public class TestFragment extends Fragment {

    private FragTestBinding mBinding;

    @Nullable
    @Override
    public View onCreateView(@NonNull LayoutInflater inflater, @Nullable ViewGroup container, @Nullable Bundle savedInstanceState)
    {
        mBinding = FragTestBinding.inflate(inflater,container,false);
        mBinding.btnFragment.setOnClickListener(new View.OnClickListener() {
            @Override
            public void onClick(View v) {
                mBinding.tvFragment.setText("홍드로이드 프레그먼트 클릭 !");
            }
        });

        return mBinding.getRoot();
    }
}
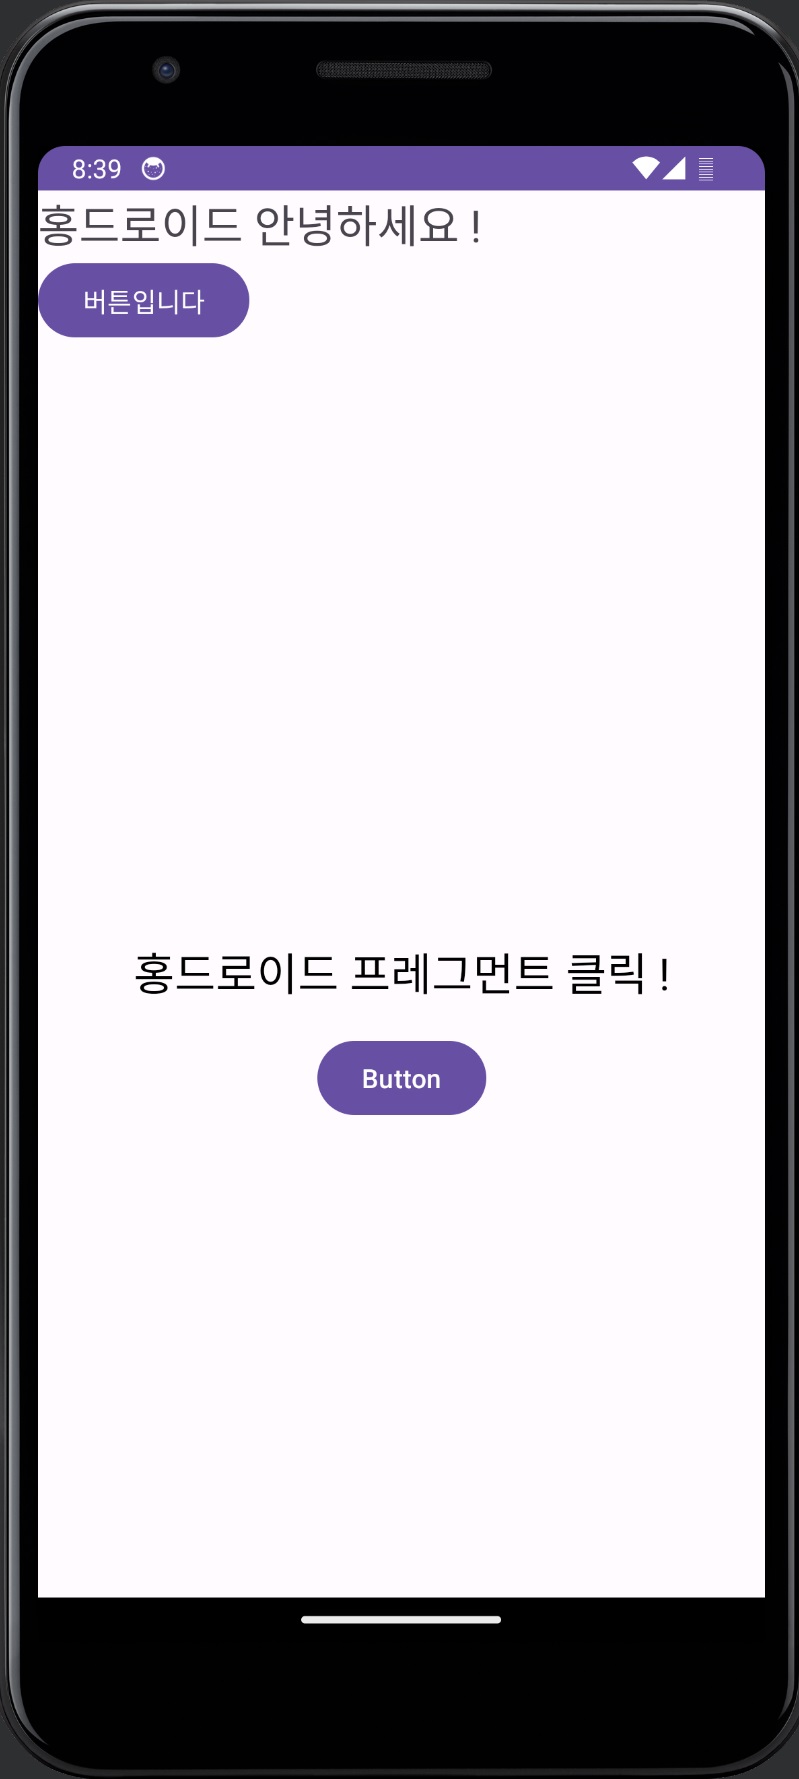
결과
카멜 표기법, 파스칼 표기법 이란?
https://blog.naver.com/callme_jaid/223034063756
카멜 표기법, 헝가리안, 파스칼, 스네이크 등 변수 명칭 작성법 총정리
카멜 표기법, 헝가리안, 파스칼, 스네이크 변수 명칭 작성법 총정리 안녕하세요 자립가 제이드입니다. 이번...
blog.naver.com
카멜 : 단봉 낙타 ex) firstName
파스칼 : 쌍봉 낙타 ex) FirstName
728x90
'[Android Studio] (Java)' 카테고리의 다른 글
| [Android Studio] RegisterForActivityResult (0) | 2023.09.03 |
|---|---|
| [Android studio] 생명 주기 (Life Cycle) (0) | 2023.09.03 |
| [Android Studio] Frame Layout (뷰 끼리 겹치기) (0) | 2023.09.03 |
| [Android Studio] Fragment 간 데이터 전송 (1) | 2023.09.03 |
| [Android Studio] Table Layout (엑셀 표 느낌) (0) | 2023.09.02 |